
Author: Lnvo
- •
- How-To, Knowledge Base, Lnvo
- •
- 3 min read
Creating an estimate in Lnvo is a straight forward process and can be created one of two ways:
Inside a project
In the Documents view
From either of these two places inside the app you’ll be able to choose “New Estimate” from the action menu.
Note: There is one exception for Project Invoicing. If you already have an estimate in the project then you would create a New Change Order instead.
Now, whether or not you need to use an estimate is up to you and how your business works. If you are using Project Invoicing you must start with an Estimate.
Setting Up Your Estimate
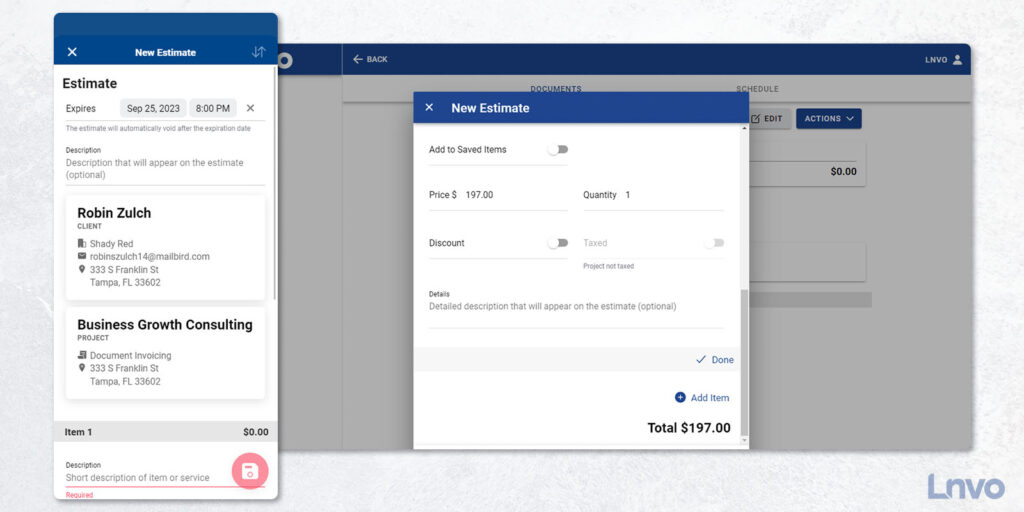
Once you’ve selected “New Estimate” the first toggle you’ll see is if you want to have the estimate expire.
Adding an expiration to an estimate means that if the client does not approve it by your specific time the estimate will automatically be marked void.
This protects you and the client since things change over time and you will also want them to take action sooner than later.
Note: In your Document Settings you can turn on email reminders that will get automatically sent to your client for expiring estimates.
If you started inside a project, you’ll automatically have your selected client and project attached to your invoice. Otherwise create or add your client and project now.
Finally, add your items that make up your estimate:
Description
Price / Quantity
Enable Discount (if it applies)
Enable Tax (if it applies)
Extra Details
Add as many items as you need and when you’re ready tap the “Save” button.
This will save and take you into a view of the Estimate with several actions you can take:
Send to Client (Email or Text/Share)
Edit the Estimate
Manually Mark as Approved
Duplicate
Void
Delete
When you send your Estimate off to your client, they will be sent a Client Portal link to review the document and Lnvo will capture their Digital Signature as part of the approval process.
Their digital signature will show up on the finalized PDF for your estimate. And, once you have an approved estimate you can easily turn it into an invoice and get paid.
- •
- How-To, Knowledge Base, Lnvo
- •
- 5 min read
Getting paid is the oxygen for your business. Sending out an easy-to-understand, easy-to-pay invoice is key to making sure you’re paid on time.
Every Invoice you send should clearly tell your client who you are, payment details, how much they owe, and how to pay.
When you go to send a newly created Invoice, Lnvo automatically generates a document (pdf and link) with all those details and frictionless payment options.
There are three ways to create an invoice in Lnvo:
from inside a project
while viewing the Documents tab
or converting an estimate into an invoice
>> Jump to Steps for Document Invoicing
>> Jump to Steps for Creating an Invoice from an Estimate
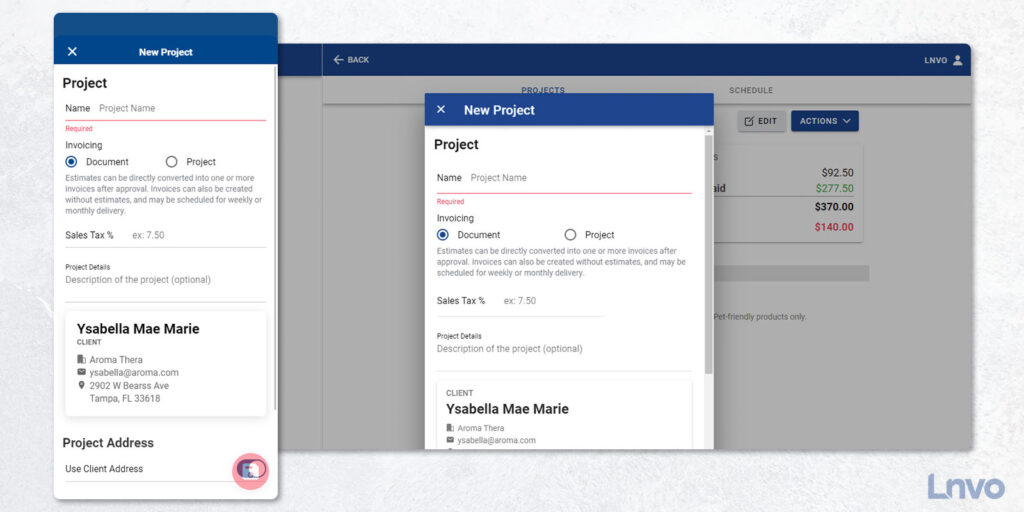
Document vs Project Invoicing
Lnvo supports two types of invoicing depending on your needs. The most common and default method is “Document Invoicing”.
Document Invoicing works as you’d expect. You are simply creating an invoice with or without an estimate and are able to schedule repeat or future delivery.
Project Invoicing creates invoices based on the approved project balance. That balance is based on an initial estimate, change orders, and any previously invoiced amounts. Plus, every invoice will include the entire project history.
If you’re looking for the most simplistic form of invoicing and don’t need to account for change orders or entire project based revenue, then choose Document Invoicing.
Either way, you’ll be able to look at any project and see if it has been set to Document or Project Invoicing.
Document Invoicing: Creating a New Invoice
When using Document Invoicing, creating an invoice from inside a project or while on the Documents tab has an identical process:
Scheduling
Payment Terms
Description
Client & Project
Items to Invoice
From either view start by tapping the action button and selecting New Invoice.
At the top of the New Invoice page, the first toggle allows you to enable scheduling your invoice to send via email at a future date or on a reoccurring basis (such as weekly, bi-weekly, or monthly).
Next, you can set your payment terms or when you want to get paid. If you want to be paid immediately, keep the Payment Terms set to “On Receipt”.
If you want payment due in a specific amount of days use one of the given options or choose a custom date. Net 7 means the invoice is due in 7 days and likewise for the other options.
Underneath the due date you can toggle on or off online payments via Stripe. Going one step further you can toggle on/off whether you want to accept bank or credit card payments.
Next, you have an optional place to write a project description that will also show up on the invoice for your client.
If you’re starting inside a project the current client and project will automatically be tied to the invoice. From the Documents tab, you’ll be asked to either create or search for a client and project.
Next, you’ll input your line items including:
Description
Price
Quantity
If the item is a Discount or not
If Tax applies
Any extra optional Details for the line item
All of these items will be auto calculated for you including price per quantities, discounts, and tax.
Note: Tax is set inside each project (as that amount can vary depending on where your project is). Edit the project in order to edit or set the tax percentage.
When you are done, tap the “Save” button and you’ll be immediately brought to a view of the document itself including an overview, history, and preview of the PDF.
And then when you’re ready to send, click the “Send” button and choose “Send by Email” or “Text or Share”.
Creating an Invoice from an Estimate (and Invoicing a Project)
Whether using Document or Project Invoicing, creating an invoice from an estimate are very similar. In both instances, the estimate must be approved before you can convert it into an invoice.
If you’re using Document Invoicing, you’ll select the estimate you’d like to invoice and click the “Invoice” button.
If you’re using Project Invoicing, you will have to be in the project itself and use the action button to select “Invoice Project”.
When you create an invoice from an estimate, you’ll be able to set payment terms and choose what percentage of the estimate you want to invoice.
For instance, maybe you want to invoice 50% of the estimate up front. At the bottom of the invoice you’ll see a slider that allows you to choose the exact percentage you’d like to invoice, whether it’s 20% or all of it!
When you’re done and ready, click the Send button to immediately email, text, or share the invoice and Client Portal link.
- •
- How-To, Knowledge Base, Lnvo
- •
- 2 min read
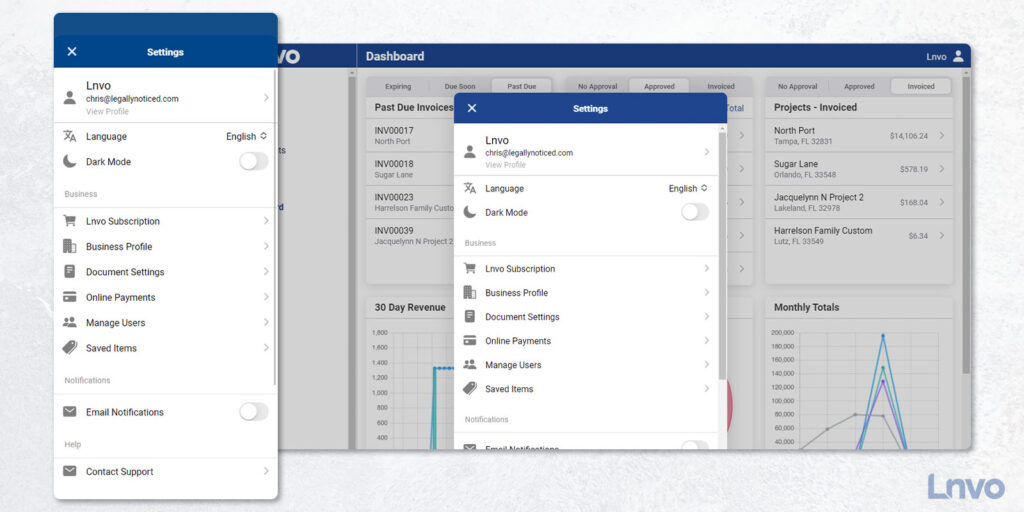
When you sign into Lnvo for the first time, one of the initial steps you should take is to update your Business Profile.
Start by clicking the User or Profile icon in the top right corner. This will bring up your Settings.
Updating your Business Profile & Document Settings are important first steps because this is where info will be pulled for your project documents and for integrating your Stripe account.
Don’t worry, you can always come back and update these anytime.
Under Business Profile you’ll be able to add your logo, contact info, and address.
You’ll also be able to add your website and a brief overview about your business - which is good practice to distill your business into a short pitch.
Under Document Settings you’ll see toggles for automatic client reminders, time zone, and what prefixes you’ll use on your documents.
We recommend the default prefixes for easy distinction, but you’re free to make it your own.
Also inside of settings you’ll be able to control:
Language Preference
Dark Mode On or Off
Your Lnvo Subscription
Setting Up Your Online Payments
Managing Users
Viewing and Adding Saved Items
Enabling Push and/or Email Notifications
Finally, you can also edit your personal user profile and password or contact support.
- •
- How-To, Knowledge Base, Lnvo
- •
- 2 min read
One of our core goals at Lnvo is to help you focus on what will grow your business.
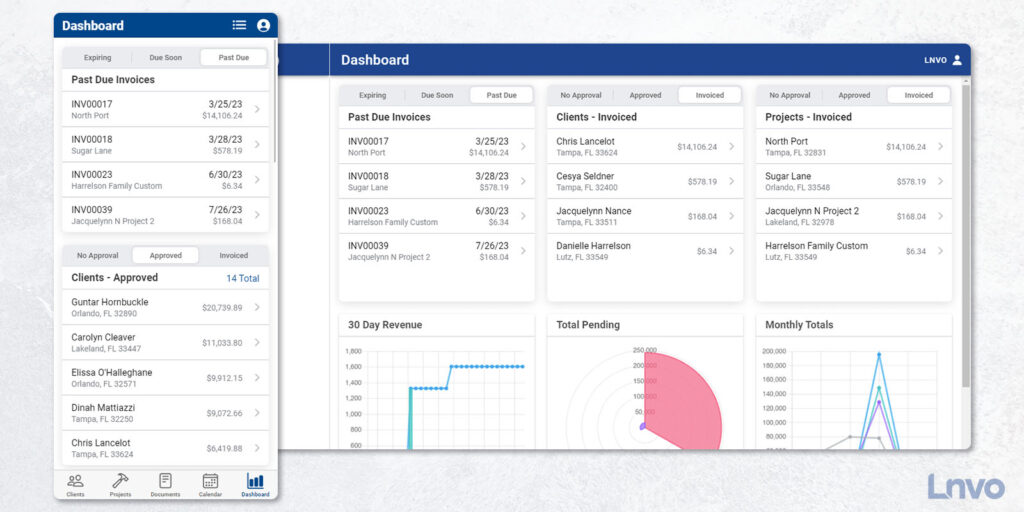
The Dashboard view is your at-a-glance reporting for some of the most important numbers and actions needed in your business.
Here you’ll find widgets you can reorder or turn on or off to your liking.
In a snap you can see documents, clients, and projects that need your attention.
Each document widget has three tabs showing you the latest five documents that match. If you have more than five that match you’ll see a total in blue in the top right of the widget. Tap that total and a complete list will appear in a new view.
The other great widgets in your dashboard include snapshot charts of your last 30 days of revenue, total amounts pending, and monthly revenue totals.
Each one is interactive to show you more info or hide what you don’t want to see.
Think of these graphs as a business health report. It’s always important to have a pulse on your business.
The last widget is Activity History. Here you can see every action that was taken in your Lnvo account, even if it's by another user.
You’ll find timestamped events such as photos being added to a project or an invoice being marked paid.
Think of Activity History as one amazing audit log so you can see who’s doing what and when.
Finally, if you click into any event in Activity History it’ll take you right to that client or project.
- •
- How-To, Knowledge Base, Lnvo
- •
- 3 min read
The Projects view functions very much like the Clients view in the app. In fact, it is an extension of that view since you have to have a client in order to have a project.
Lnvo was built to keep you organized including being able to create multiple projects for a single client.
Think of it like a nice and neat filing system for your business.
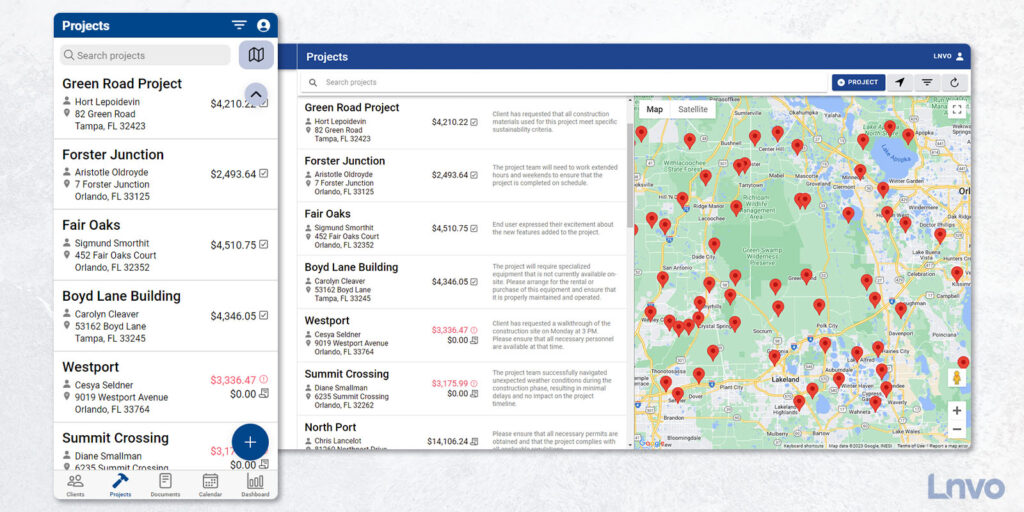
On the Projects view you’ll find a toggle for List or Map view in the top right corner.
Also at the top, you’ll be able to search for projects by the name you gave each project, client name, address, or even the client’s business name.
In the List view, you’ll see each project with contact details and at-a-glance project totals such as paid or invoiced.
Tapping into any Project will show you important info that you can even share with a client via a link.
First, inside a Project you’ll see details, photos, revenue totals, and any document that is tied to the project such as an estimate or invoice.
Keep in mind, anything you write or add here is something your client can also see when you send them their Client Portal link or a project document.
The top will allow you to switch tabs between documents or any scheduled appointments for the project.
The bottom right action button will give you options for every action you can take except delete.
If there are no paid documents, then you can find delete via the three dots in the top right corner. Be careful, because once you do, there’s no restoring.
Your Client Portal link to share is available in these same menus and is available to send how you please (i.e. email or text).
The Client Portal looks almost identical to your Project view. Your client will be able to see all photos, documents, and details. They can click into each document to review, approve, or pay.
Finally, in the top right corner of their Client Portal they’ll be able to open a menu to view all other projects that you have for this client.
- •
- How-To, Knowledge Base, Lnvo
- •
- 2 min read
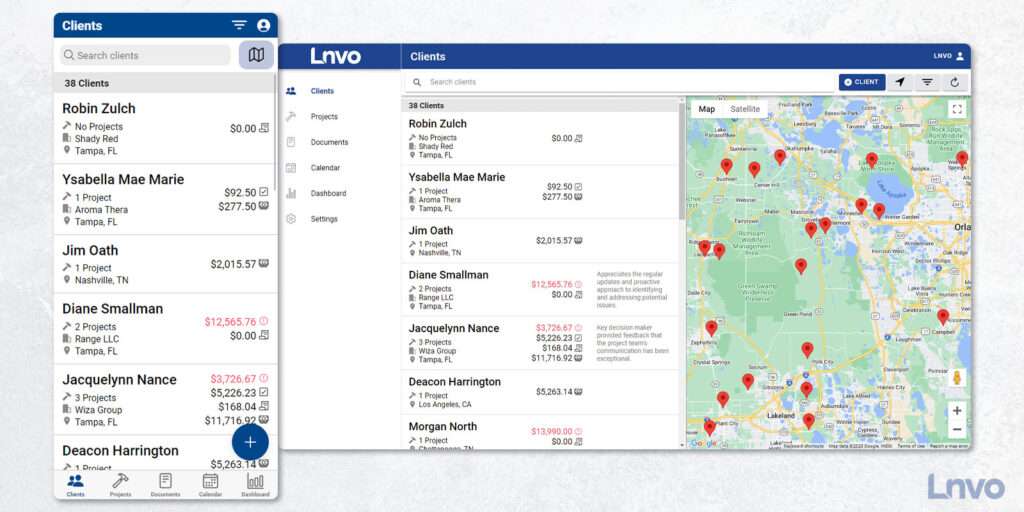
On the bottom menu, the first tab brings you to the Clients view.
Here you’ll have a full list of all of your clients with easily searchable data at your fingertips.
Clients are listed with important details such as # of projects, location, and at-a-glance amounts like invoiced or paid.
You can click on each client to drill down further and see detailed info, revenue totals, any scheduled appointments, and project information.
Plus, in the selected client, if you tap on their client card you’ll pull up relevant actions such as edit, email, or call.
At the top of the Clients view you have the ability to search for clients by name, email, city, or even phone number.
Plus, since we all know how easy it is to make typos on the phone, it’ll even bring up results that closely match.
In the top right corner, you’ll find a toggle for a List or Google Map view of all of your clients.
Finally, if you need to add a new client, on the List view you can click the plus sign in the bottom right corner.
When you’re done, hit Save!
- •
- How-To, Knowledge Base, Lnvo
- •
- 2 min read
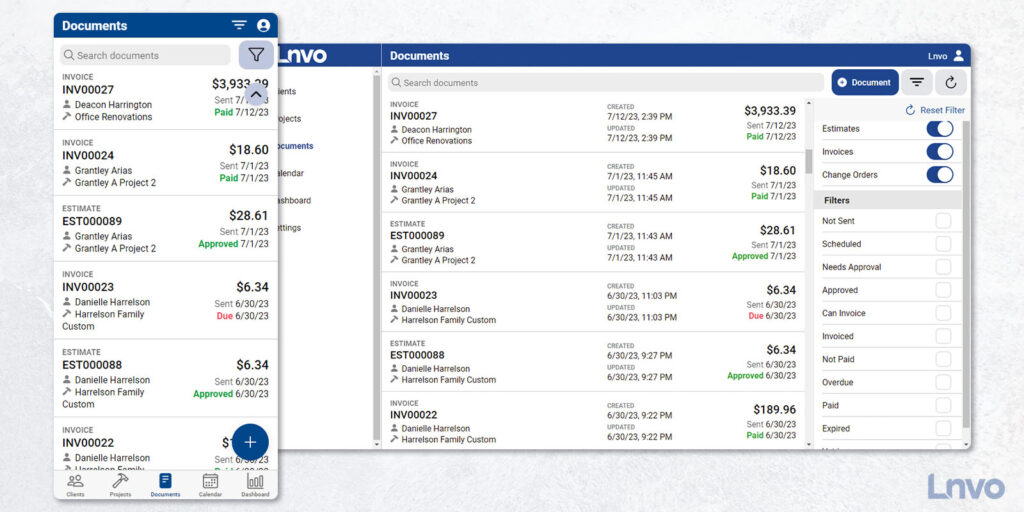
The Documents tab serves to give you quick access to every document you create.
In the top right corner, if you tap the funnel icon, a filters list pulls up for you to show or hide documents by type or status.
Need to see all documents that are overdue? Toggle the Overdue filter on.
Need to check which documents have not been sent yet? Toggle on the “Not Sent” filter.
Especially as you have more documents or are waiting on clients, this view will become your best friend to see specific documents all-at-once.
The List view will also have indicators for documents that are Approved, Due, Not Sent, or Paid.
Here’s the best part of the Documents view… When you’re ready to create a new invoice or estimate tap the “+” button in the bottom right corner.
Either option will take you to a new page to create that document with the ability to add or create a new client and project all in one single view.
This is the fastest way to create a new client, project, and estimate or invoice all at once.

Want your clients to pay you faster? Do you actually know who owes you money? Are you aware of people who pay you late?
When it comes to your invoices you may be making it harder for your clients to pay you. And, one of the most impactful things you can do to ensure business growth is making sure you’re paid on time.
Here are the top 5 things every single invoice you send should clearly state or have so you get paid faster.
## WHY DIDN’T THEY PAY ANYWAYS?
Ever get distracted from completing a task? So do your clients. And, it’s as easy as a notification coming up on their phone or the wind blowing in a funny direction.
It’s up to us to make sure we eliminate the obstacles for clients and make it clear how to pay you and when.
Clients may tell you they never got the invoice or maybe it got lost in email or spam. Maybe they even got it, but just forgot about it. Or worse, it just wasn’t a priority to pay you, so they put it off.
And sometimes a client is ready to pay, but they’re looking at your invoice and aren’t sure how to pay you.
That’s why it’s absolutely paramount you’re aware of your financials (meaning, who needs to pay you) and you make it super clear how to pay you and when.
## #1 - AVOID BAD INVOICING HABITS
Totally get it. You’re busy working day in and day out. So, you set aside some time on a Sunday night to get your invoices done and sent.
However, sometimes, so much time lapses between when you’ve done a job and you actually send an invoice that your client may have kind of forgot about paying you.
At that point, they’re not looking out for your email or you’re just not a priority to them anymore.
Lnvo helps you invoice on the spot, on the go, wherever you are. That way you’re not invoicing late or chancing your clients feel less connected when too much time passes.
Set aside time during your working hours to invoice regularly or make it a part of doing the job right there and then.
## #2 - DEFINE YOUR INVOICE CLEARLY
Another reason a client may not pay you right away is because they’re confused about the invoice you’ve sent.
Every invoice should have key items that clearly define who you are, why you’re invoicing them, and what they need to do.
Sometimes a client may ask you to specify a note or item on the invoice and if that’s missing, they’re inclined to not pay, since they’ll want that corrected first.
Make sure all your invoiced items are clearly described. If a client is confused or has questions they’ll stop the process of paying you and instead want to talk to you first.
Lnvo generates every invoice for you automatically with these key points in place so a client is never confused and always ready to pay.
## #3 - BE CLEAR ABOUT PAYMENT
Your payment terms should also be clear and displayed. The due date should be visible and obvious.
As a helpful rule of thumb you should also define your payment terms before you even send your invoice. That way your client knows what to expect and isn’t surprised by how and when you want them to pay.
Plus, be clear about how long you give them to pay you. Some people default to 30 days…but, does anyone really need a 30 day grace period to pay?
What if they could pay you within 3 days or immediately? Or perhaps you’re just collecting a partial payment now and the rest later?
Lnvo allows you to set these terms up so you can invoice and get paid your way.
## #4 - MAKE IT EASY
Besides having clear payment details, you’ll also want to make sure it is super easy for your client to pay you.
Paying you should be frictionless. Easy online payment options and links let clients pay the invoice as soon as they open it, even if it’s the middle of the night.
Give them multiple options if available or just clarify how you prefer payment before you even send the invoice over.
You did a great job, right? They want to pay you for your service. Make it easy for them.
## #5 - REMIND THEM TO PAY YOU
You probably are already in constant communication with your client. So, let them know when you’re about to send the invoice.
Then after you send it, give them a bit of time and then check and see if they got it. We all know sometimes emails just don’t get delivered or things weirdly end up in spam.
Lnvo has done its due diligence to help make sure your email invoices aren’t flagged as spam. Plus, you can easily send invoices via a text message with a Secure Client Portal link. Text messages are way more likely to be received and opened.
And, if they don’t pay you right away, make sure you send them a personal note and reminder. Personal notes actually help increase the likelihood of you getting paid faster.
Lnvo will also send out a reminder email on your behalf as the due date approaches or if a payment is past due. And, Lnvo will help you keep track so you know if they’ve paid the invoice or not.
All of these steps are important to help make sure you’re paid on time and fast. Doing your own due diligence of communicating expectations with your client can go a long way to make sure no one is confused and both parties agree.

As a business owner or entrepreneur, it is easy to feel overwhelmed by never-ending to-do lists. In fact, the big, daunting tasks on these lists may be the source of your business paralysis preventing you from finding real success.
Mark Twain wrote, “If it’s your job to eat a frog, it’s best to do it first thing in the morning. And if it’s your job to eat two frogs, it’s best to eat the biggest one first.”
Stay with me… the frogs Mark Twain is speaking of is a metaphor for those huge, boulder tasks. In fact, this quote became the premise for author, Brian Tracy, to give you a plan to “Eat That Frog.”
Brian Tracy leans into the idea of “eating that frog” providing you insight on how to overcome procrastination and accomplish your goals. Lessons that benefit every business owner.
## Identify and Tackle Your Biggest Task First:
The first step in prioritization is knowing what your most important tasks are. I get it, they’re all important, but which one will actually have the most impact if you take care of that one first? Which task will create a positive domino effect for other tasks going forward? Which one, if crossed off, will free your mind to think about other tasks clearly?
Identifying this “frog” task is pivotal for setting yourself up for success. Once you accomplish it you build momentum for the rest of your day. In fact, after you “eat that frog,” nothing else seems so bad. It is a snowball effect of maximum productivity and empowers you to conquer your next challenges.
## Prioritize and Focus on High-Value Activities:
There’s a good chance you’ve heard of the 80/20 rule, as it has become a staple in explaining so many aspects of our lives. This rule, or Pareto Principle, teaches us that 80% of our results will come from 20% of our input.
Said another way, this means that 20% of our tasks will actually have the biggest or 80% of our desired outcomes.
Operating under this truth allows us to sideline those less important tasks or busywork, and focus on the high-value to-do’s that will have the most impact in our business and lives. Focusing on this 20% will optimize your time and energy while maximizing success.
## Tools to Master Time Management and Avoid Procrastination:
The ideas of “eating that frog” and focusing on our 20% are cornerstones for our best time management practices. However, just knowing the principles is not enough, we must be able to take action.
Having effective tools at our side will allow us to wage war against procrastination. These tools can be as simple as task lists or calendars. Having what is most important written down gives you a prompt to complete it. With practice, these tools will allow us to complete our most important tasks before they also become our most urgent because we put them off for far too long.
We can even use goal setting devices to break bigger tasks into smaller, manageable steps. That way each part of the task feels like an accomplishment as we inch towards “eating that frog.”
Starting these tasks immediately will empower us with momentum to take on the next task. Working these habits is like exercising a muscle that will ultimately be the driving force behind maximizing our productivity, mastering time management, and finding business success.

Tracking and analyzing your business metrics can be the difference between setting yourself up for success or feeling like you’re running on an endless hamster wheel.
Every decision you need to make in your business is founded in the details, actions, and data you’re already producing. This can be as simple as tracking lead generation, client follow-up, or financial reporting for example.
## **Have the Right Tools for the Job**
First, we all have limited hours every day, so have the right tools and software to make tracking a breeze. For instance, if you’re looking for a snapshot of potential revenue to be collected, Lnvo shows you exactly what invoices you have sent or which are pending.
The Lnvo dashboard shows you the metrics that matter to grow your business. You get a complete snapshot of your invoicing financials along with a complete history of activity done by you or your team. And, that’s just the reporting dashboard.
## **Improved Accountability**
Once you have access to your metrics, you can rest assured the numbers don’t lie. If you’re tracking client or lead follow-up you can see how fast you or your team reached out, how many times you followed-up, and what the result was.
Did you know that, according to a study published by Harvard Business Review, leads contacted within the first 5 minutes are 400% more likely to become customers?
How about the fact that you have a 90% better chance of making contact with a lead after 6 call attempts? And, most businesses give up after the first call… if they even get that far!
## **Enhanced Organization and Efficiency**
Beyond keeping you or your team accountable, metrics will help you stay organized. You’re more likely to be more productive (and miss less) if you’re operating off organized data.
There’s a reason why fighter jet pilots operate off checklists. Not only will you be accountable, but you’ll also be more likely to get action items done if your data is organized.
## **Data-Driven Decision Making**
Having metrics to track and organized data at your fingertips means you can make decisions based on what you’re seeing…not what you’re feeling.
If you have goals you’re targeting, you’ll know exactly where you need to take action based on what your metrics show. Have invoices outstanding? Waiting on approval for estimates or proposals? Keep it all tracked and follow up.
## Efficient and Effective
Tracking and analyzing your metrics is a sure-fire way to keep you efficient and effective in maximizing the success of your business.
During these busy seasons of life it pays to have data at your fingertips that you can review. Use the right tools that simplify tracking and reporting for your business and you’ll find you’re making things just a little easier on yourself.